
Provisioning (auto-provisioning using templates)
One of the easiest ways to set up many handsets is to use the auto-provision function built within the platform. This isn’t just used for the one-time setup of the handset but also for administering changes throughout the life of the telephone handset. It also plays a major part in offering clients hot desking and providing other features like handset DND sync with the telephone network. Several handsets are supported either as a fully supported product, like the branded hosted handset and the Yealink range of handsets or partly supported, giving basic provisioning for handsets like the Snom range.
If you look after customers underneath your account and are a reseller, then setting the default provisioning at your top-level account can and will affect all customers underneath you. This is a great way to set the absolute defaults you want to use for you and your customers. Of course, this can be changed on a per-customer and per-telephone basis, too, by going into each customer and changing their default settings or even on each Telephone Account and changing the provisioning settings.
This function can be found under the ‘Features Advanced’ tab. Then select ‘Provisioning’ if you are on a top-level account.
|
|
||||
|
|
||||
| You can change any of the settings. If your handset supports our auto-provisioning and is directed to our servers for provisioning, the above settings will become the default for every customer's handset. If you are making changes in a particular customer, they will relate to this customer only. | ||||
|
|
||||
|
||||
|
||||
|
|
||||
|
Selecting the custom settings under BLF settings ‘BLF Provisioning’ will allow you to add buttons at the bottom of the page. These buttons will auto-populate onto a branded hosted handset and/or MobeX if you use the MobeX web desktop or MobeX+ mobile app. We recommend not showing the BLF idle LED, leaving this set to ‘No', and leaving the monitor with your own extension set to ‘No’. This is because it stops your handset from lighting up with lots of lights and informs you that the handsets are plugged in and ready to receive calls, which in most circumstances are not required. The lights used on a handset to show status are generally red and green. Green shows that the handsets are available in the case above, and red shows that a user is busy. Some people are colourblind, making it impossible to see what is happening with the BLF when this mode is in use. Not selecting to monitor your Extension means it will not populate a button on your handset, freeing up a button to be used for another telephone Extension. |


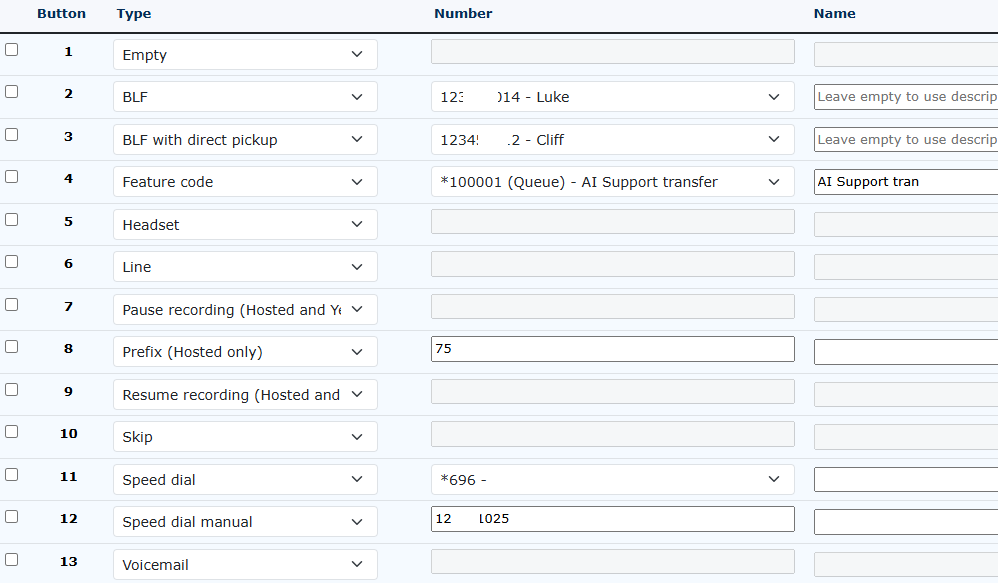
| This will simply leave the button/key unprogrammed. This could be useful if left to the end user to program themselves. |
|
|
|
The Busy Lamp Field option lets you enter the extension you want to monitor. You can see the status of the extension when it is ringing, on a call (busy), idle or in a function like do not disturb (DND) |
| The same as the BLF/busy lamp field, but with the added advantage of being able to pick up the call directly when the monitored phone is ringing to take control of the call. |
|
|
|
This will perform whatever function is configured for the feature code number. This will also create an icon on the BLF keys/Presence keys of the MobeX suite of software. |
| Creates a button to switch between the headset and the handpiece for audio. (Some handsets have these as a default button and therefore may not be needed. |
|
|
|
If you have multiple accounts you wish to access from the provisioned handset, you can select which lines you would like to see on any of the buttons. |
| Enables a Pause of the recording if the extension is being recorded. |
|
|
|
Enables a resume of the recording if the recording was paused above. |
| Allows a prefix code to be dialled and displayed before dialling the extra digits, like a telephone number. |  |
|
|
This will leave whatever is already under the button, and no provisioning will be sent from the portal. |
|
This uses the speed dials from within the portal. It allows for a quick one-touch dial-out on a key. |
|
|
|
Similar to speed dials, but these are programmed directly here. |
|
Adds a key button to access your voicemail. Most handsets have this as standard, so it may not be required. |
|


Drag & Drop Buttons
|
You can click and hold your cursor to drag and create the required layout order.
To rearrange the layout, click on the button's number and either drag it up to move it to a higher position or down to move it to a lower position. |
|

At the bottom of the provisioning page

Load system settings This will reload the default system settings for provisioning set by the provider. If this is the customer provisioning set-up, then this will default back to whatever settings you have enabled in your customer set-up as the reseller.
Send provisioning request to all registered handsets If handsets are using the provisioning system, this will force a new set of provisioning instructions. Be warned that if anything big changes, like adding extra BLF buttons, this may cause the handsets to reboot and install the extra buttons as required.