Hunt Groups - Advanced Settings
A Hunt Group is used for calling more than one Telephone Line. There can be different levels in a Hunt Group. For example, call the receptionist in level 1, then call all staff in level 2. If no one answers it will go to the end destination (default) which could be a voicemail or another destination.
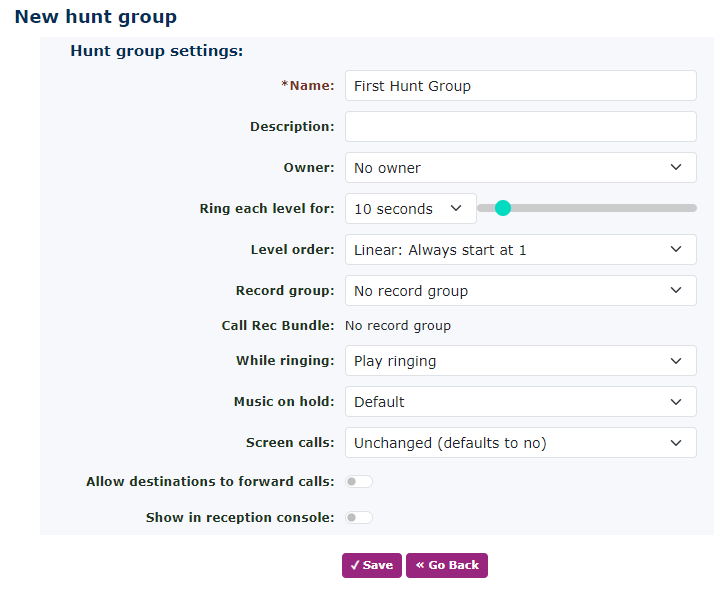
When you create a hunt group it will appear as below. Give your hunt group a name and click save.
Just return to the hunt group and you will see all the following options.
| Name | To set up a Hunt Group, press new and give it a familiar name. In the example below, ‘Main number Hunt Group’ has been used. |
| Description | If you need to add more information about the Hunt Group you can add it here. |
| Owner |
If you set the owner here, depending on the owner's access rights, they can manage the Hunt Group when they login to the portal. This doesn’t affect the Administrator being able to change settings. |
| Ring Each Level For | Choose how long you want to ring each level. This will become the default for all the levels. |
| Level Order |
There are 4 level orders:
This will make every call that enters the Hunt Group first start ringing at level 1 and follow the order thereafter.
This will remember where the last call was answered on what level and the next call that comes in will be answered on the next level.
This will change the Hunt Group into a looping Hunt Group. Meaning that if there are 4 levels, after level 4 it will return to level 1, but at the same time it will remember where it started ringing the last call and the next call will be the next level.
This will again remember where the call was last answered and ring the next level from there. |
| Record Group |
If you have already added a record group to the system, then this option will appear. You can select what record group you would like to add the Hunt Group to. |
| Call Rec Bundle | If you have already added a call rec bundle to the system and allocated this hunt group to it, then this option will appear. |
| While Ringing |
You can choose to select a ringing tone to callers or play one of the many Music On Hold options. Keep in mind that if the call is coming straight into a Hunt Group and there hasn’t been an announcement to the caller, It would be strange for a caller to hear music without any pre-announcement. The pre-announcement could be added to the Number or Feature Code that is pointing to this Hunt Group, to give the caller a better call experience. This is the default setting so remember in the various levels you may choose to use, you could select a different option for each. |
| Music On Hold | This will be the music selected the Hunt Group, and will play if an option is selected for playing music while ringing. |
| Screen Calls | If this is enabled, it will play the CLI of the number calling you. You can also select if you want the caller to record their name so it can be announced before the call is answered by the handset. The destination will need to press 1 to accept the call. This is great if the Number is going off-network to a mobile for example. This would give the receiving party more information about the call before they answer. |
| Allow Destinations to Forward Calls |
This means that if the handset is in a call forward mode, then calls ringing this Hunt Group will also ring the destination of where the handset has been called forwarded to. |
| Show in Reception Console |
This will allow the queue to be seen in the Reception Console that is under the option at the top of the systems menu. |
| Use same Destination on Busy or Unregistered | If this is set to yes, then it uses the default destination below ‘on no answer’ setting. If you choose no it will display more menu options and the next 2 options will appear ‘On Busy’ and ‘On Unregistered’ At the bottom of the page under the levels. |
|
On No levels answered If none of the telephones answer in any of the levels set, it will then follow this destination On Busy |
Destinations
Now you need to add the destinations in the Hunt Group. These could be external numbers if you wish, but normally this would be Telephone Lines.
There can be up to 10 levels in each Hunt Group. This allows for plenty of messages or ringing of handsets to be created, to help with the smooth delivery of the call.
Add all the Telephones you require in the Hunt Group one by one and click save for each.
You can add the same telephone in multiple levels up to 10 telephones in each level. You cannot add the same telephone line at the same level.
After you are happy with the telephones in the various levels, you can now add some comfort messages and change the ringing of each level to play Music On Hold (MOH) instead. This is an excellent way to engage with the caller and play the caller an advertisement about your customer's products and services. Create your own audio file here This will take you to the Text to speech service where you can record new announcements.
Level Settings
This option can be found on the right-hand side of each level you have created. Once you have clicked on the level settings you will see the following:


